SSH Keys rotation
- 2 minutes to read
- Print
- DarkLight
- PDF
SSH Keys rotation
- 2 minutes to read
- Print
- DarkLight
- PDF
Article summary
Did you find this summary helpful?
Thank you for your feedback
For SSH Keys, senhasegura can use the same operation workflow described for passwords change. The difference is just in the screens and menus used to manage SSH Keys.
As credentials using usernames and passwords, SSH Keys should be related to devices.
- Access the menu PAM Core ➔ SSH Keys ➔ SSH Keys to get access to all SSH Keys registered
- Click at the report action button, New
- At the Information tab, fill the following fields:
- Username (key owner): operating system user owner of the key
- Device: device where the SSH Key is installed
- Key name: an alias for internal senhasegura identification
- Key path: the physical location of the key inside the device file system
- Status: flag if the key is able for use inside senhasegura
- Tags: user defined tags for data segregation and filters inside senhasegura

- At the Key data tab, fill the following fields:
- Set current password: checkbox to define manually the current key password
- Show password: checkbox to define if the password field will display the plain-text password without mask
- Password: input the current password
- Private key: input the plain-text private key value as PEM format
- Public key: input the plain-text public key value

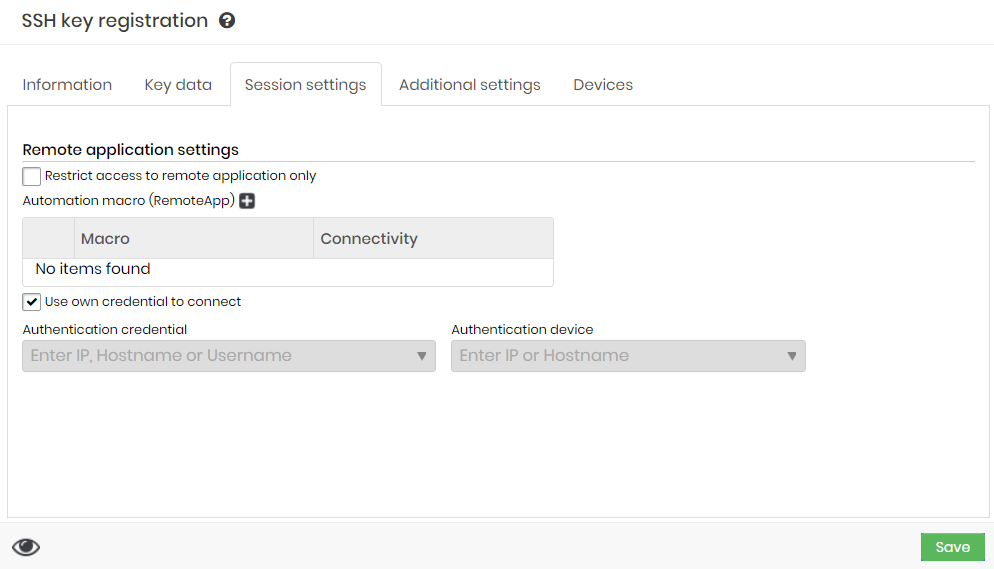
- At the Session settingstab, fill in the following fields:
- Restrict access to the remote application only: Check this option if you want only remote applications to be able to access this SSH key.
- Automation Macro (RemoteApp): Add a template that will use RemoteApp Macro and the Connectivity type.
- Use own credential to connect: Check this option if the credential registered in this SSH key is the same as the one that will run the remote application.
- Authentication Credential: Enter IP, Hostname, or Username if it is a different credential from the registered one.
- Authentication Device:Type IP or Hostname if it is a device other than the registered one.
 Form - Session settings
- At the Addition settings tab, fill the following fields:
- Enable automatic change: check if you want senhasegura to enable this key to automatically be changed
- Use the key itself to connect: check if you want to use the key itself to authenticate the target SSH session
- Credential or SSH key for authentication: if you choose not to use the key itself for authenticate, you can choose another credential to execute the change process

- At the Devices tab, you can link all devices to which this key is published. senhasegura will replace the key at the owner device and echo the public key into the related devices
Once finished the SSH Key registering, you can execute a change operation request as explained earlier.
Was this article helpful?


