Single Sign-On with ADFS
- 2 minutes to read
- Print
- DarkLight
- PDF
Single Sign-On with ADFS
- 2 minutes to read
- Print
- DarkLight
- PDF
Article summary
Did you find this summary helpful?
Thank you for your feedback
This guide intends to show how you can use your ADFS (Active Directory Federation Services) server to make a single sign-on with senhasegura.
Requirements
Create an ADFS provider
SAML Authentication is necessary to create an SSO (single sign-on) using Windows ADFS and senhasegura.
Go to Settings ➔ Authentication ➔ SAML ➔ Providers:
- Inside the SAML provider screen, select
⋮and+ New provider
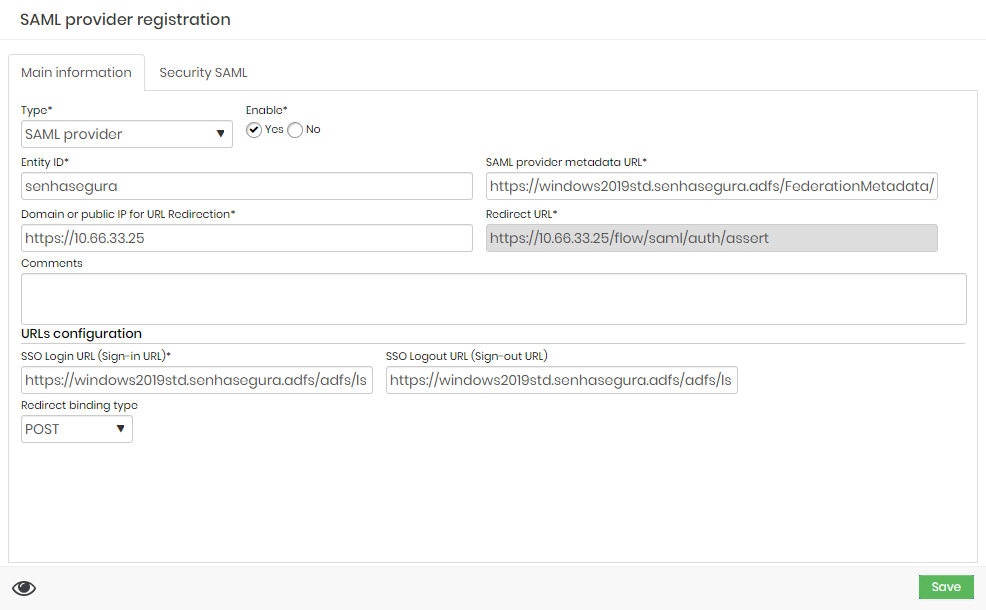 SAML Provider Form
Select SAML provider as Type
Leave Enable as Yes
Type the Entity ID. It must be one of the relying party identifiers created in your Windows ADFS server.
CautionPay attention to upper and lower cases. The Entity ID must be the same as shown in your Windows ADFS server.
Try to avoid using https:// for your relying party identifiers.Insert your ADFS metadata url. It should be similar to the example below:
https://windowsadfs.company.com/FederationMetadata/2007-06/FederationMetadata.xmlIn Domain or public IP for URL Redirection, type your senhasegura url. For example:
https://mysenhasegura.company.comIn the URL configuration, type the Login and Logout ADFS Endpoints URL. For example:
https://windowsadfs.company.com/adfs/lsSet the Redirect binding type to POST
Click Save
Create a new Relying Party Trust for senhasegura
- Go to your Windows ADFS server and run the program "AD FS Management"

- Right click Relying Party Trust and choose Add Relying Party Trust...

Select Claims aware
Select Enter data about the relying party manually
Define a Display name
In both fields: Enable support for the WS-Federation Passive protocol and Enable support for the SAML 2.0 WebSSO protocol, add the Redirect URL provided to you in the SAML provider registration


- Add a Relying party trust identifier. We are using "senhasegura" in this example.

- Finish and close.
ADFS Claim Issuance Policy
In some scenarios, depending on how you have your users in senhasegura, you might need to change the Claim Issuance Policy. In this example, senhasegura users have a username with [email protected]
Go to your Windows ADFS server and run the program "AD FS Management"
Right click in the Relying Party Trust used for senhasegura
Click Edit Claim Issuance Policy...
Create a rule for the name

- Create a rule for the email

ADFS Entity ID
To find your ADFS Entity ID, you must:
Go to your Windows ADFS server and run the program "AD FS Management"
Right click in the Relying Party Trust used for senhasegura
Click Properties
Select the Identifiers tab
Use one of the Relying party identifiers or add a new one.
ADFS Metadata URL
To find your ADFS metadata URL:
Open PowerShell
Execute the following command:
(Get-ADFSEndpoint | where Protocol -eq "Federation Metadata").FullUrl | Select AbsoluteUriOutput
AbsoluteUri
-----------
https://windowsadfs.company.com/FederationMetadata/2007-06/FederationMetadata.xml
ADFS URLs Configuration
To find your ADFS URL configuration, you must go to your Windows ADFS server:
Open PowerShell
Execute the following command:
Get-ADFSProperties | Select FederationPassiveAddressOutput
FederationPassiveAddress
------------------------
/adfs/ls/
Use the FederationPassiveAddress, then your ADFS URL configuration should be:
https://windowsadfs.company.com/adfs/ls/
Was this article helpful?
