About GitLab and integration with DSM
In senhasegura DSM, the integration with CI/CD pipelines is carried out via the CLI. This tool captures all the environment variables running during a specific compilation or deployment, providing discovery of sensitive variables and dynamically injecting secrets from a secure vault directly into the environment variables. This dynamic approach contributes to secure and efficient secrets management in development and production environments.
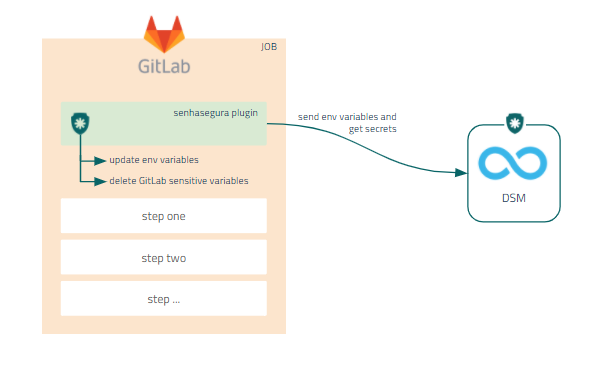
The image below shows a diagram of how the integration between senhasegura DSM CLI and GitLab CI/CD works:
Requirements
- A user with access to GitLab with permission to add and edit project files.
- The origin GitLab server has access to senhasegura.
- Properly configured runb and senhasegura-mapping.json files.
- The machine where the plugin is running must have the following packages installed: bash, jq, sed, and curl.
If you don't have the runb and senhasegura-mapping.json files, ask the senhasegura support team for them.
Integrate DSM with GitLab CI/CD using the DSM CLI
To integrate DSM with GitLab using CLI, follow these steps:
- Access a project from your GitLab account.
- Add the executable, the configuration file, and, optionally, the
senhasegura-mapping.jsonfile to the project's repository. - On senhasegura, access your project's CI/CD Variables through Grid Menu > Settings > Secrets > Actions.
- Register the variables needed to run the DSM CLI as described in the user guide.
- Edit your
.gitlab-ci.ymlfile in your project folder; - During the desired work in your pipeline, add the code to run the DSM CLI and confirm the change to the file.
- Run the GitLab pipeline to finish.
Example of a .gitlab-ci.yml configuration file using the DSM CLI:
# This file is an example to demonstrate the usage of DSM CLI inside a GitLab pipeline
# Make sure to upload the executable and the configuration files to your project
# For more information on its usage, please visit https://docs.senhasegura.io/

default:
  image: debian

build:
  script:
    - dsm runb \
        --app-name "$APPLICATION" \
        --system "$SYSTEM" \
        --environment "$ENVIRONMENT" \
        --config .config.yml
    - source .runb.vars # After this command the secrets should be available
Ensure you select OAuth 2.0 as the authentication method in senhasegura DSM, as the CLI uses it to fetch information.
Use the DSM CLI to inject secrets into pipelines in GitLab
Após concluir a configuração da CLI no seu projeto, siga as instruções abaixo:
- Go to the CI/CD > Pipelines menu.
- Click on Run Pipeline.
- In the next step, choose the desired branch and click Run Pipeline again.
- Then go to Status > Job Name to view the details and results of the execution.
The output of the execution will look like the one below:
Using config file: senhasegura/.config.yml
Registering Application on DevSecops
Trying to authenticate on senhasegura DevSecOps API
Authenticated successfully
Application register success
Posting variables in senhasegura...
Trying to authenticate on senhasegura DevSecOps API
Authenticated successfully
Posting variables successfully
Finding secrets from application
Trying to authenticate on senhasegura DevSecOps API
Authenticated successfully
Injecting secrets!
Injecting secret: password... Sucess
Injecting secret: PORT... Sucess
Injecting secret: VERSION... Sucess
Injecting secret: ip... Sucess
Injecting secret: hostname... Sucess
Injecting secret: username... Sucess
Injecting secret: additional information... Sucess
Secrets injected!
Deleting linux variables...
Is not possible to delete linux variables!
Finish
Do you still have questions? Reach out to the senhasegura Community.