About Jenkins and integration with DSM CLI
Jenkins has a feature that allows environment variables to be set during job execution and stored safely for later use. However, administrators must ensure that these variables are rotated regularly without interrupting the DevOps pipeline.
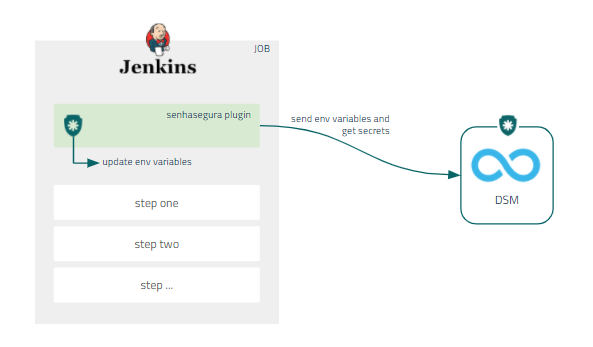
senhasegura DSM has a Jenkins plugin that uses the platform's native architecture to set environment variables during pipeline runtime. This plugin also sends all the variables available in the working environment to senhasegura DSM to discover any sensitive data that is running unnoticed, helping system administrators to have greater control over their systems.
The image below shows a diagram of how DSM and Jenkins are integrated:
Integrate DSM with Jenkins
senhasegura DSM provides a native integration so that Jenkins jobs can fetch secrets directly from senhasegura, thus providing an easy way to configure secret injection.
To install the senhasegura Jenkins integration using the .hpi file, follow the steps below:
- Access your Jenkins instance.
- On the home page, click the Manage Jenkins option in the side menu.
- Click the Manage Plugins option.
- On the Advanced tab, in the Upload Plugin section, click the Upload button and upload the
.hpifile. - To complete the installation, restart Jenkins.
- The integration of senhasegura with Jenkins is only available for Jenkins 2.235.1 or more recent versions.
- Ensure you select OAuth 2.0 as the authentication method in senhasegura DSM, as the plugin uses it to fetch information.
Configure integration with Jenkins
Once the plugin is installed, follow the instructions below:
- Create a new job or select an existing one.
- In the side menu, click on Configure.
- Scroll to the Build Environment section and select the senhasegura DSM Plugin checkbox.
- In the senhasegura URL field, enter the URL used to access the senhasegura instance.
- Click the Add button to create a new Jenkins credential.
- In the open window, select senhasegura Auth Credential.
- Fill in the Client ID and Client Secret fields with the data provided by DSM.
- Optionally, provide an ID and a description and click the Add button.
- In the senhasegura Auth Credential field, select the credential created in the previous step.
Inject secrets using Jenkins
After setting up the integration in the project, go to the Build Now menu to run the pipeline and use the secrets. When the job is finished, click Job ID > Console to display the execution result.
The execution result will look like the one below:
Started by user XXXX
Running as SYSTEM
Building in workspace /var/Lib/jenkins/workspace/DSM
Sending all enviroment variables to senhaseguras' server
API status code is 200
For sending vars: senhasegura returned à successfull responde with code 200
Getting all senhaseguras' secrets and storing it as environment variables
API status code is 200
For getting vars: senhasegura returned a successfull responde with code 200
Analyzing returned variables from Secret 13
Saving variable PASSWD with value ****
Saving variable additional_information with value ****
Saving variable aliases with value ****
Saving variable SECRET_ACCESS_KEY with value ****
Saving variable PORT with value ****
Saving variable ip with value ****
Saving variable HOST with value ****
Saving variable ACCESS_KEY_ID with value ****
Saving variable USER with value ****
Saving variable TTL with value ****
[DsM] $ /bin/sh -xe /tmp/jenkins14979126717851661906.sh
Do you still have questions? Reach out to the senhasegura Community.